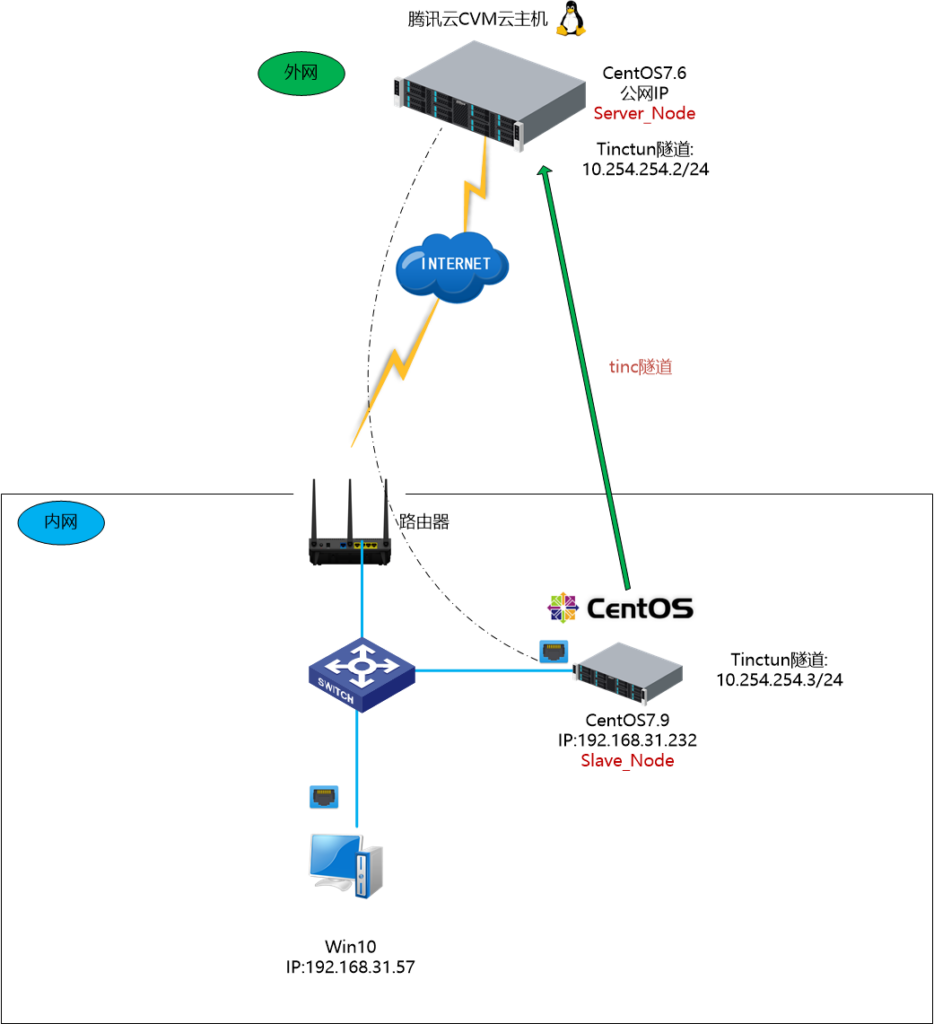
使用tinc+quagga搭建个人SD-WAN网络
拓扑如下
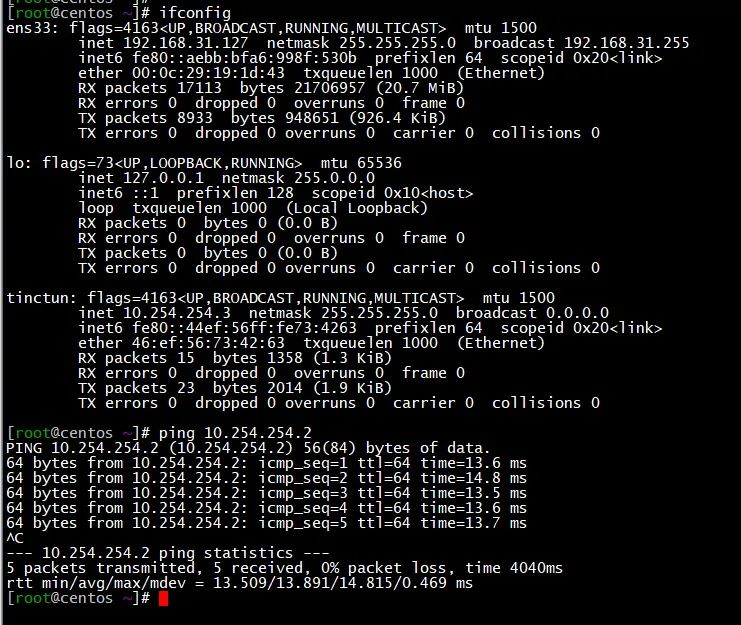
一、tinc安装与配置
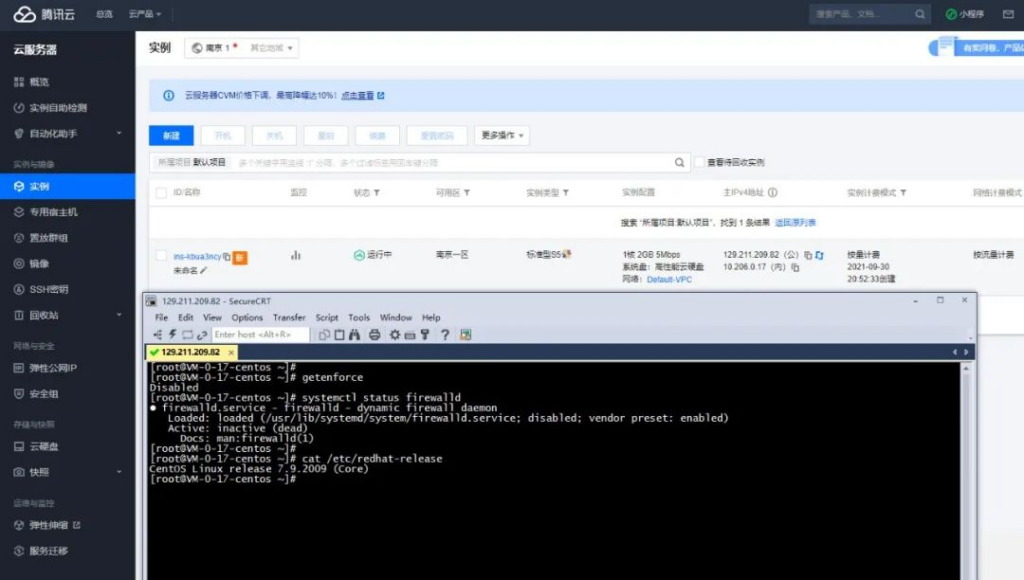
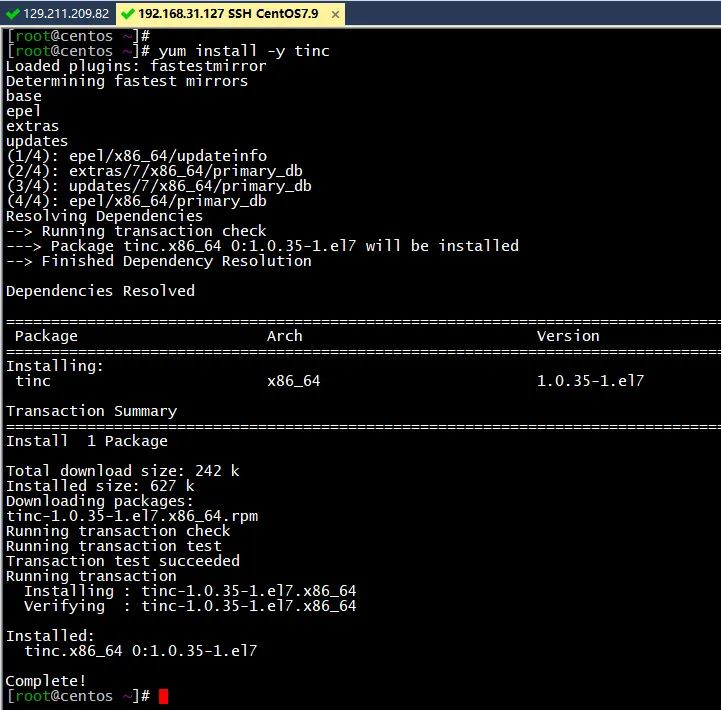
1、CentOS7云主机安装tinc
yum install tinc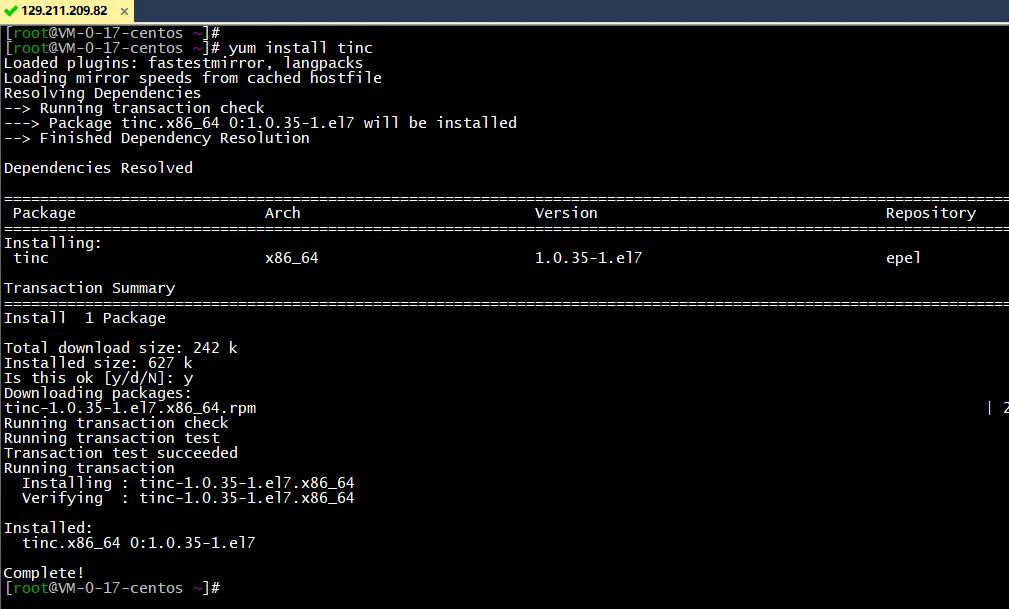
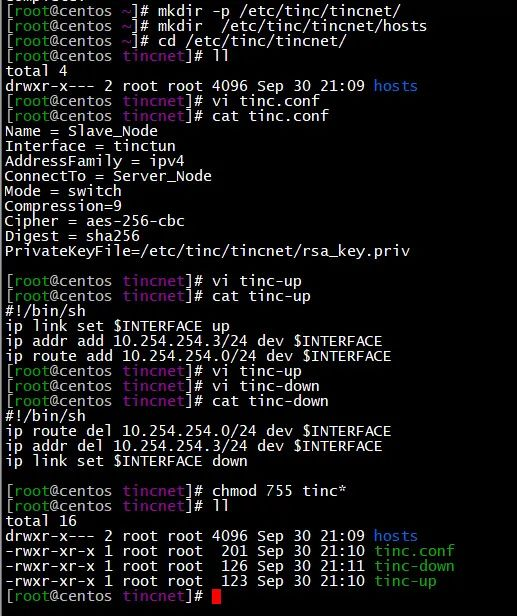
mkdir -p /etc/tinc/tincnet/
mkdir  /etc/tinc/tincnet/hosts
cd /etc/tinc/tincnet/
ll

vi tinc.conf

Name = Server_Node
Interface = tinctun
AddressFamily = ipv4
Mode = switch
ConnectTo = Slave_Node
Compression=9
Cipher = aes-256-cbc
Digest = sha256
PrivateKeyFile=/etc/tinc/tincnet/rsa_key.priv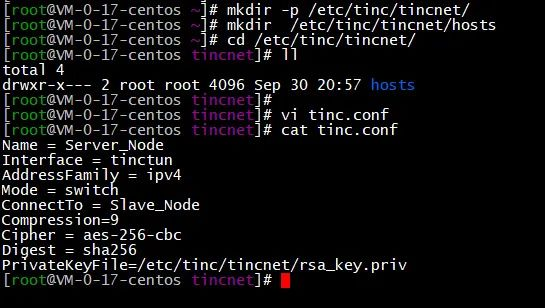
vi tinc-up
#!/bin/sh
ip link set $INTERFACE up
ip addr add 10.254.254.2/24 dev $INTERFACE
ip route add 10.254.254.0/24 dev $INTERFACE

vi tinc-down
#!/bin/sh
ip route del 10.254.254.0/24 dev $INTERFACE
ip addr del 10.254.254.2/24 dev $INTERFACE
ip link set $INTERFACE down

chmod 755 tinc*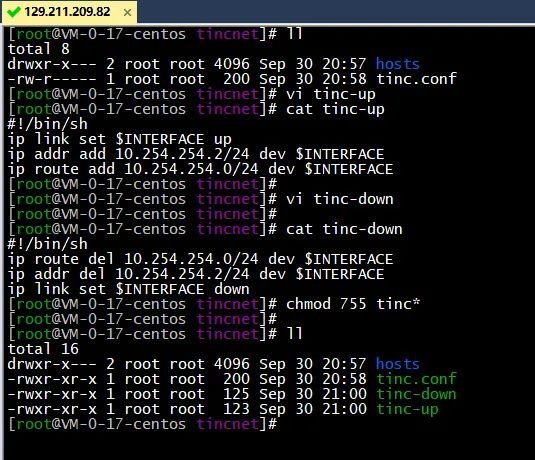
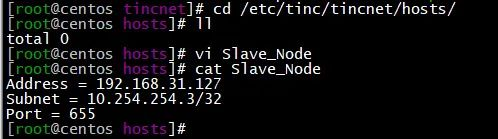
cd /etc/tinc/tincnet/hosts
vi Server_Node

Address = 129.211.209.82
Subnet = 10.254.254.2/32
Port = 655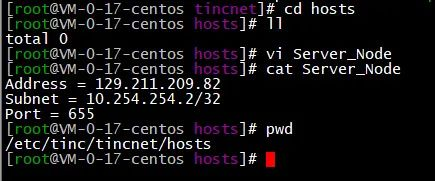
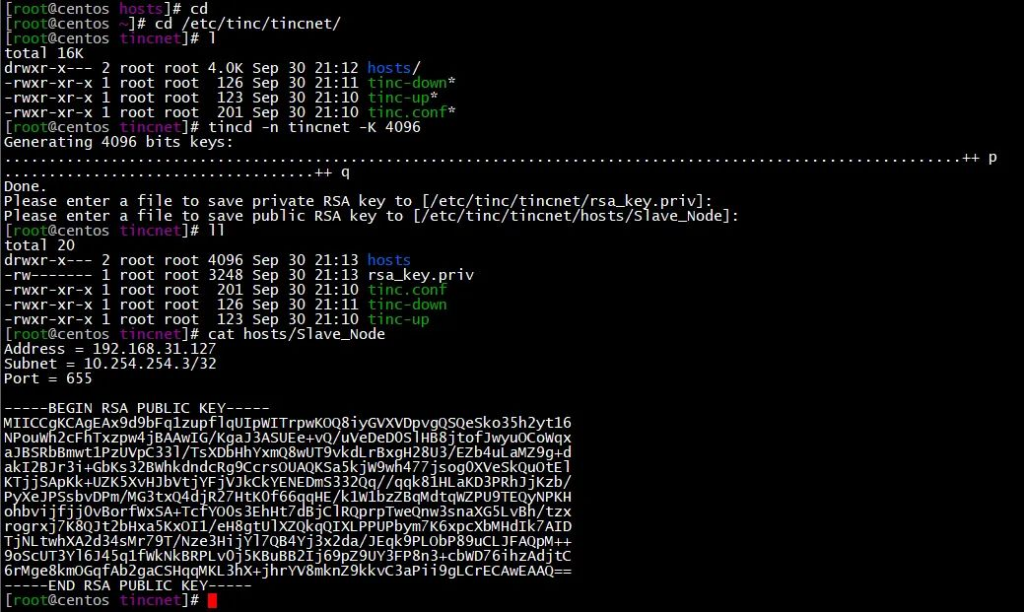
通过tincd生成非对称密钥

#通过tincd生成非对称密钥
tincd -n tincnet -K 4096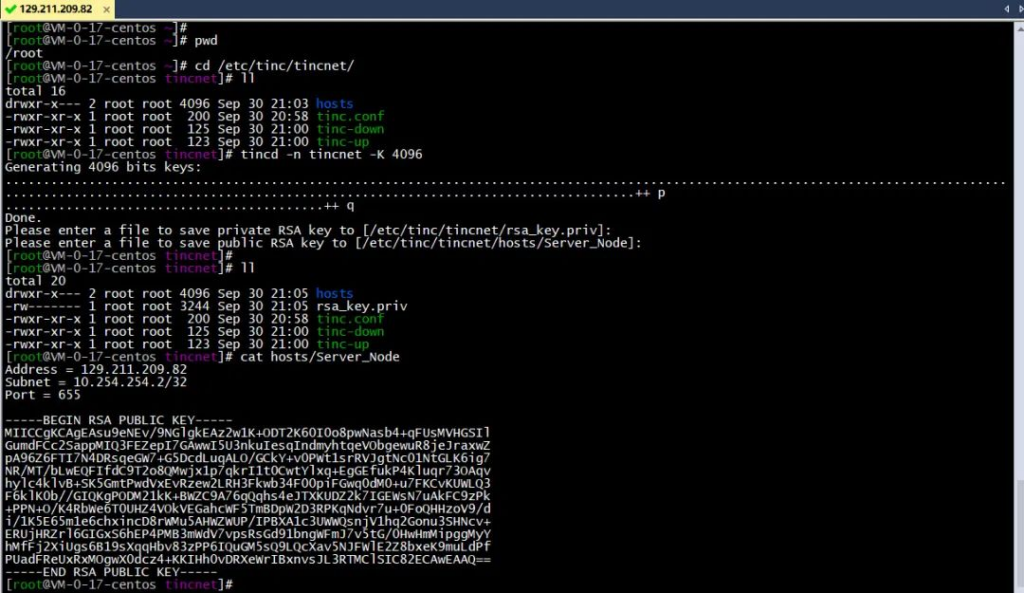
2、分支节点安装配置tinc
配置与上面类似,不再赘述,截图如下
3、保证两个节点的hosts文件夹都有全部节点的hosts信息
scp /etc/tinc/tincnet/hosts/Slave_Node root@129.211.209.82:/etc/tinc/tincnet/hosts/

scp root@129.211.209.82:/etc/tinc/tincnet/hosts/Server_Node /etc/tinc/tincnet/hosts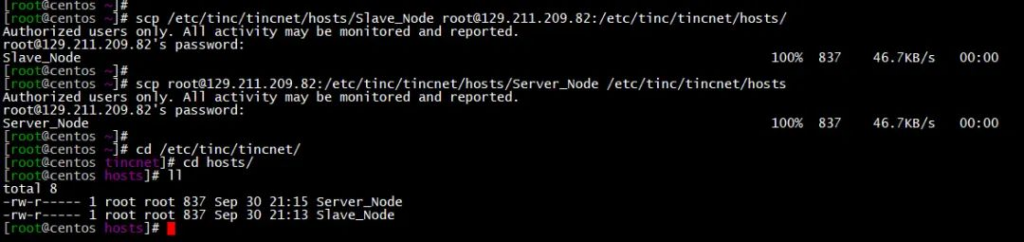
4、配置etc/sysctl.conf文件
net.ipv4.ip_forward = 1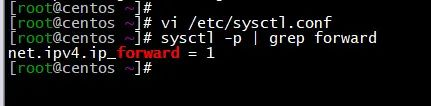
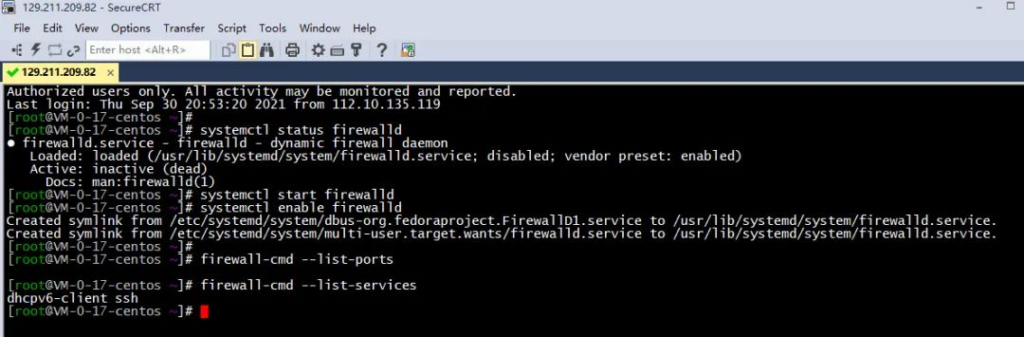
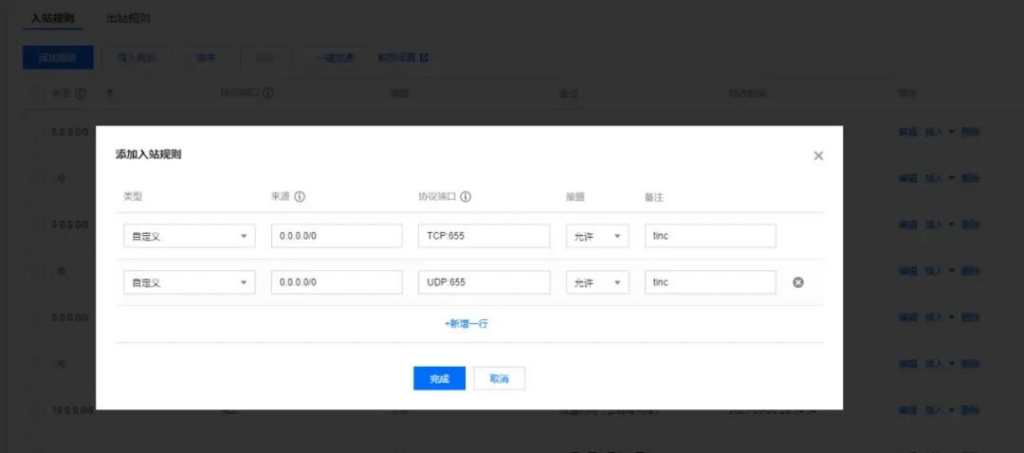
5、防火墙放通655端口

6、启动tinc服务
systemctl start tinc@tincnet
systemctl status tinc@tincnet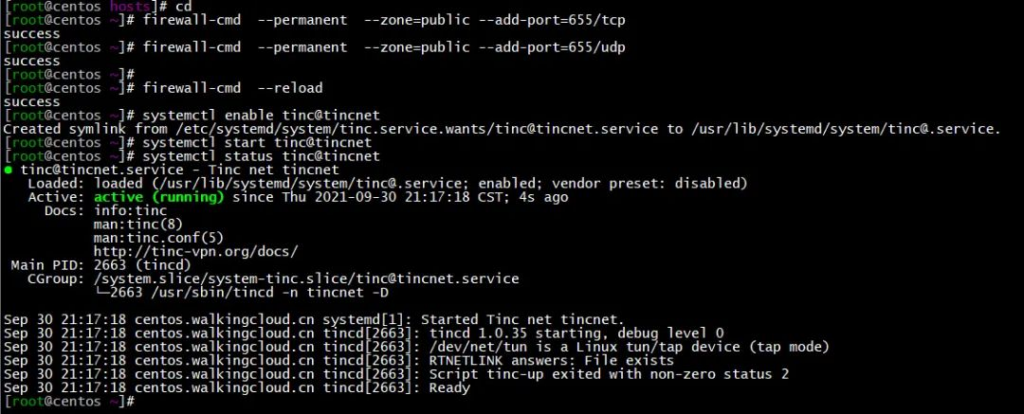
二、手工静态路由方式实现互访
添加路由前截图
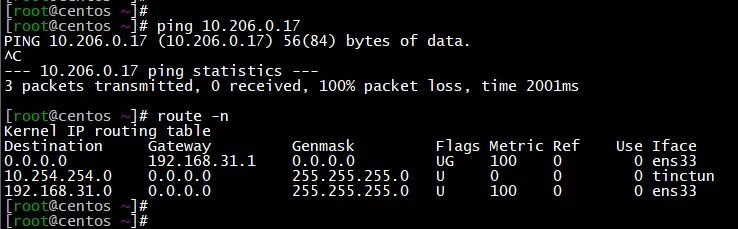
例如分支节点上添加静态路由
route add -net 10.106.0.0/20 dev tinctun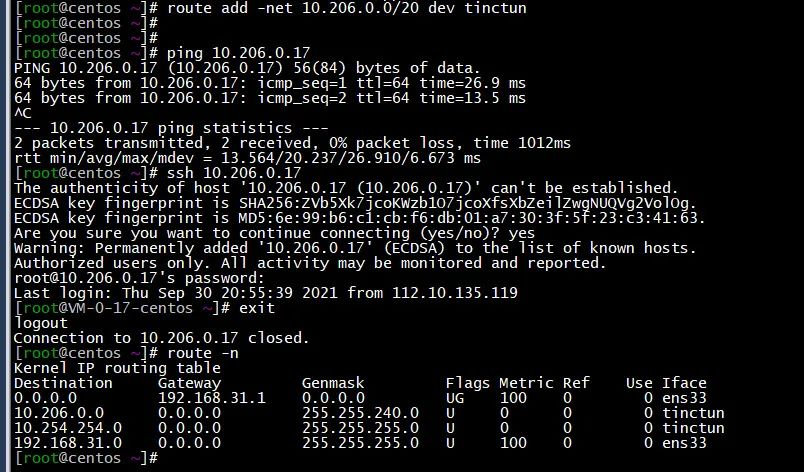
三、安装quagga配置ospf实现互通
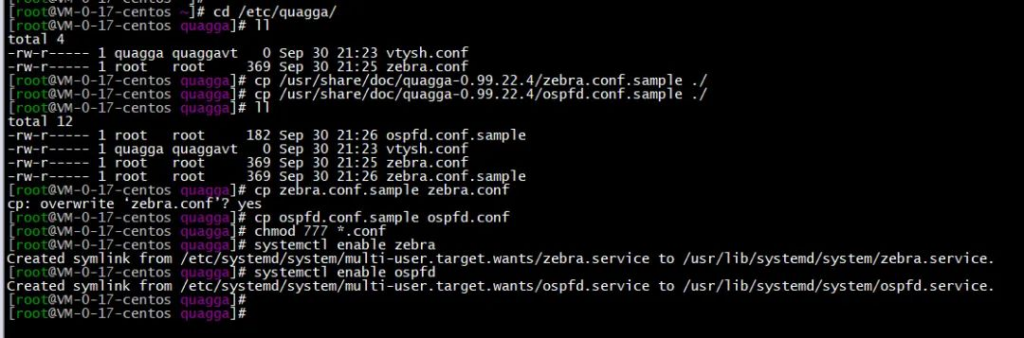
1、两节点均安装并配置quagga
yum install quagga
cd /etc/quagga/
cp /usr/share/doc/quagga-0.99.22.4/zebra.conf.sample ./
cp /usr/share/doc/quagga-0.99.22.4/ospfd.conf.sample ./
cp zebra.conf.sample zebra.conf
cp ospfd.conf.sample ospfd.conf
chmod 777 *.conf
chmod 777 /var/log/ospfd/
systemctl enable zebra
systemctl enable ospfd
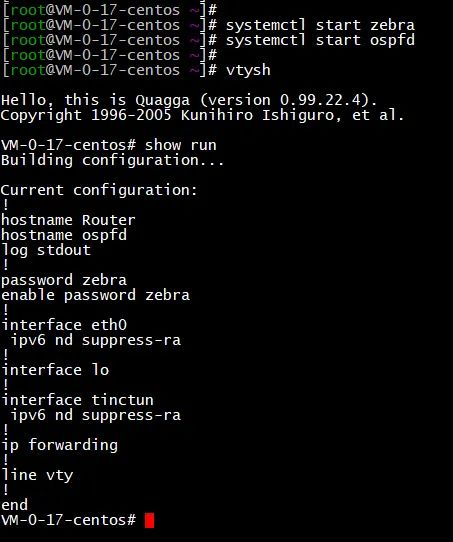
systemctl start zebra
systemctl start ospfd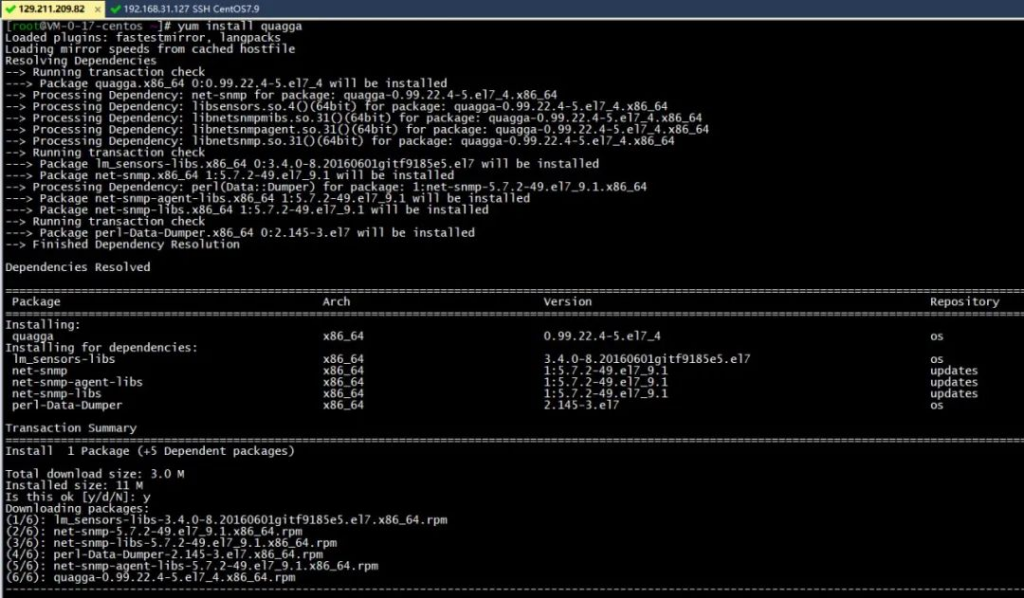
2、vtysh进行配置ospf
主节点配置步骤如下
VM-0-17-centos# conf t
VM-0-17-centos(config)# interface  eth0
VM-0-17-centos(config-if)# description  Server_eth0
VM-0-17-centos(config-if)# no shut
VM-0-17-centos(config-if)# exit
VM-0-17-centos(config)# interface  tinctun
VM-0-17-centos(config-if)# description  Server_tinctun
VM-0-17-centos(config-if)# no shut
VM-0-17-centos(config-if)# exit
VM-0-17-centos(config)# router ospf
VM-0-17-centos(config-router)# router-id  1.1.1.1
VM-0-17-centos(config-router)# network  10.254.254.0/24 area 0
VM-0-17-centos(config-router)# network  10.206.0.17/20  area 0
VM-0-17-centos(config-router)# exit
VM-0-17-centos(config)# log file /var/log/quagga/ospfd.log
VM-0-17-centos(config)# exit
VM-0-17-centos# wr
Building Configuration...
Configuration saved to /etc/quagga/zebra.conf
Configuration saved to /etc/quagga/ospfd.conf
[OK]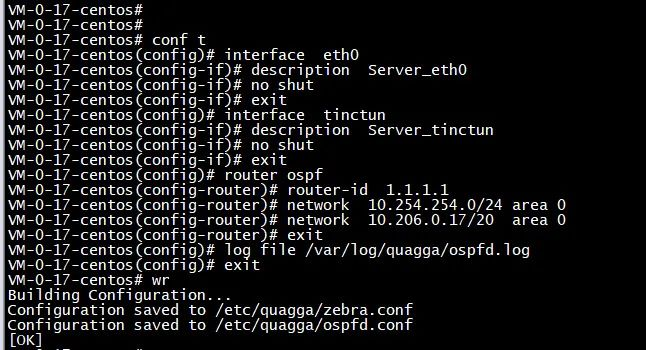
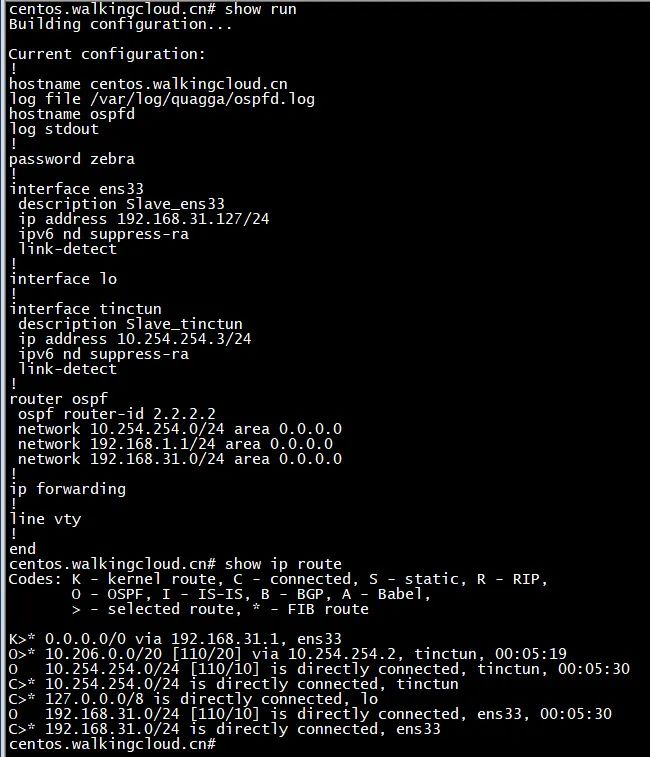
分支节点配置步骤如下 vtysh
Hello, this is Quagga (version 0.99.22.4).
Copyright 1996-2005 Kunihiro Ishiguro, et al.

centos.walkingcloud.cn# conf t
centos.walkingcloud.cn(config)# interface  ens33
centos.walkingcloud.cn(config-if)# description  Slave_ens33
centos.walkingcloud.cn(config-if)# no shut
centos.walkingcloud.cn(config-if)# exit
centos.walkingcloud.cn(config)# interface tinctun
centos.walkingcloud.cn(config-if)# description  Slave_tinctun
centos.walkingcloud.cn(config-if)# no shut
centos.walkingcloud.cn(config-if)# exit
centos.walkingcloud.cn(config)#
centos.walkingcloud.cn(config)# exit
centos.walkingcloud.cn# conf t
centos.walkingcloud.cn(config)# router ospf
centos.walkingcloud.cn(config-router)# router-id  2.2.2.2
centos.walkingcloud.cn(config-router)# network  192.168.31.0/24 area  0
centos.walkingcloud.cn(config-router)# network  10.254.254.0/24 area 0
centos.walkingcloud.cn(config-router)# network 192.168.1.1/24 area 0
centos.walkingcloud.cn(config-router)# exit
centos.walkingcloud.cn(config)# log file  /var/log/quagga/ospfd.log
centos.walkingcloud.cn(config)# exit
centos.walkingcloud.cn# wr
Building Configuration...
Configuration saved to /etc/quagga/zebra.conf
[OK]
centos.walkingcloud.cn# exit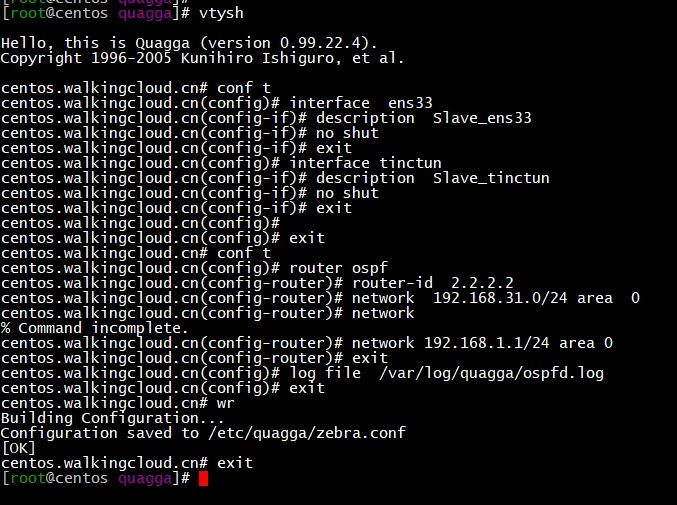
3、防火墙放通ospf协议
firewall-cmd --permanent --zone=public --add-protocol=ospf
firewall-cmd --reload
并重启ospf和zebra服务
systemctl restart zebra
systemctl restart ospfd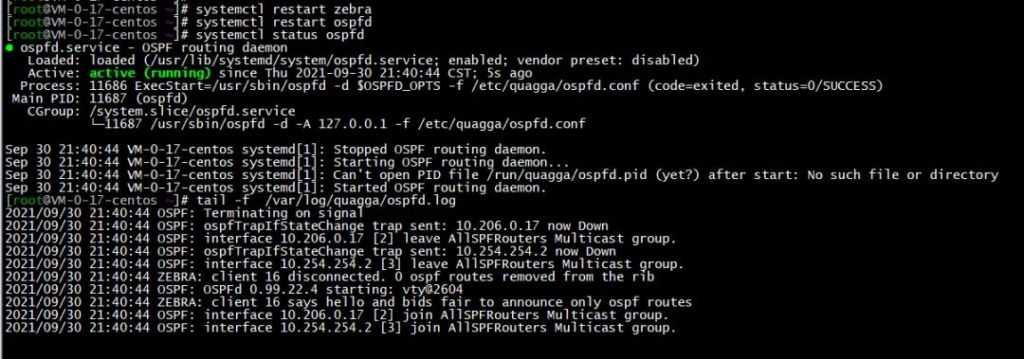
4、ospf状态检查
可以用vtysh中 show ip ospf neighbor检查邻居是否建立
show ip route查看对方是否学习到对方的ospf路由
show ip ospf neighbor
show ip route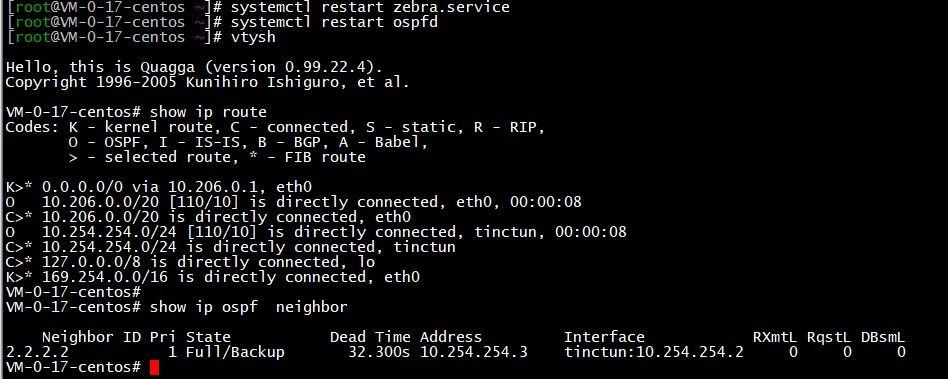
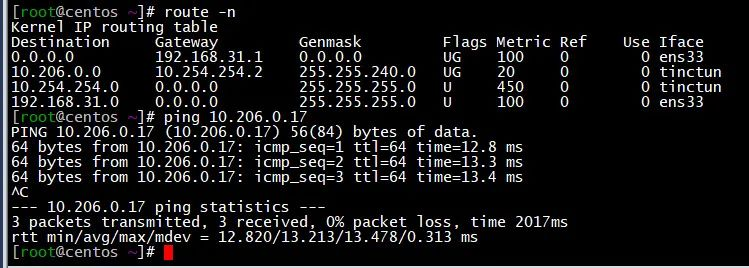
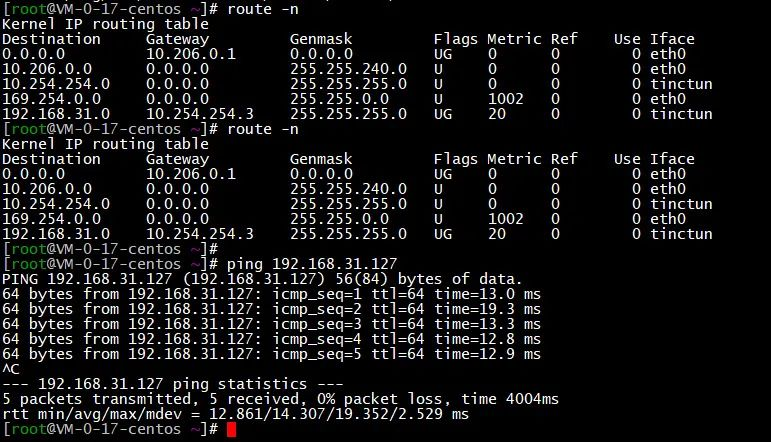
5、最后进行连通性测试
四、总结
- 1、本文只是测试使用quagga并使用ospf协议,实际中为了简单起见,可以直接使用静态路由即可
- 2、当然个人家庭网络中不会把Linux服务器作为出口路由使用,可以openwrt路由器安装tinc来实现

This article had me hooked! For further reading, check out: DISCOVER MORE. What are your thoughts?